Storing some harmful chemicals or parking the car requires a better garage floor. Because these things may damage it.
However, applying epoxy on your garage floor can be a better option. But how can you do that?
According to the report of the Energy Government in 2017, more than 63 of all housing units in the US only have their own garage.
However, some of them have attached and some detached. But these all are included in the number.
Around 333 million people are living in the US so the number is literally huge!. But most of them are fixing their garage floor every year.
That can be an annoying thing. That’s why you should use epoxy because it is tough and also good-looking.
But how can you apply epoxy on your garage floor? That’s why you need to read this complete article. Because I have shared 11 easy steps to do that.
Also, cover the advantages and disadvantages you will get after using it.
So this is going to be very interesting. That’s why don’t skip any point otherwise you will lose your chance to do that.
Table of Contents
Epoxy Floor Coating Explain
Epoxy is a floor coating material that is made with synthetic resin and other materials.
It is usually sold in kits that mainly include three items epoxy, etching solution, and decorative pallets (Which are optional).
It is usually laid on the top of the concrete floor and subtracted as a floor protection layer. After applying the multiple layers this will also work as a thermosetting coat. However, it looks like white paint but this is totally different from it.
Also, epoxy creates a tougher coating on the garage floor. So whether you have harmful chemicals and other things in your garage.
This coating can easily be managed. All you need to do is carefully apply it to the floor. However, this is not so difficult but hard work to do.
That’s why you should read the steps below.
How To Apply Epoxy On Garage Floor: 11 Easy Steps
Before understanding the proper steps of applying the Epoxy on the garage floor this is dangerous to use it. Because it contains harmful chemicals that may damage your skin.
1. Required Tools and Materials
Before executing the work you should collect these tools and materials in one place.
So that you don’t need to find them again and again before completing your work. However, you can do that but this may damage the layers.
| Tools | Materials |
| Broom | Concrete Degreaser |
| Paint Roller & Extension | Epoxy Floor Coating Kit |
| Paint Brush | 5 Gallon Bucket |
| Wet/Dry Shop Vacuum | Concrete Floor Patch |
| Rubber Boots | Painter’s Tape |
| Safety Glasses | Self Leaving Filler |
| Rubber Gloves | |
| Acid Respirator | |
| Protective Mask | |
| Garden Hose | |
| Bristle Brush |
So when you have these things then you can start your work. However, some of them may still be in your garage right now.
But some require purchase from any hardware store. But make sure to wear all the protective gear.
2. Remove Scrap From The Floor
Have you cleaned your garage floor before? What things do you store in your garage? Sometimes when we put sticky things in the garage.
They may be stuck with your garage floor. That may create problems while applying an epoxy coating.
That’s why before doing that you need to remove all of them from the floor. Especially dried paint, caulk, or anything else.
However, this is difficult work and requires more effort. But this is important to do. You can use a putty knife or scraper for this work.
They will easily do this work but be careful while doing this. Because the knife and scrapper both are very sharp tools and may give you a cut.
That’s why if you are not 18+ then you don’t do this work.
3. Preparation For Cleaning The Floor
Have you done any floor paint before? Usually, while doing any paint from anywhere in the house or garage requires covering other items.
So that they will not get painted. However, its chances are very low. Because you are painting the floor not the wall.
But for safety purposes, you should use painter’s tape and plastic film. Then start covering the items if you have some in the garage.
Or if you are seriously concerned about the safety of the wall. Because they are too expensive. Then you can also cover them for some height.
Then at the last, you need to use a small brush and try to clean the corners on the garage floor. Because dirt may hide in these places.
However, you can also clear them during the water cleaning process. But do this for your safety.
4. Start The Etching Process
Have you etched any floor before? What things should be considered while etching a floor?
So the etching solution is made from many chemicals that may be harmful to your skin. That’s why before doing this make sure to wear all the protective gear.
Then you need to mix the etching solution in the water and plastic watering can. So that you can mix them easily.
After it wet the complete garage floor from the garden hose. This will make your work easier than spreading a bucket of water on the floor again and again.
Now pour the solution using a bristle broom brush and start scrubbing the floor in one direction.
Then do this again and again until the complete garage floor is completed. Make sure to let the floor dry completely for about 4 hours. Or according to your area and space.
5. Degrease The Concrete Surface
Do you have a greased area on the garage floor? So grease is a semisolid liquid work for lubricating moving parts in any mechanical item.
This will usually be found in your car but sometimes it drops on the garage floor.
That creates a water seal layer it means you can’t use water to clean it. That’s why if you also have this kind of thing in your garage.
Then you need to use a degreaser solution. This is a special solution that is usually made for removing grease on the surface.
That’s why for creating this solution you need to mix 1 part of this mixture and 4 parts of water. Then pour it into the area where you have grease.
Then use any scrubber or bristle broom brush. Then scrub the surface roughly to clean it.
6. Fill The Joints On The Floor
Do you have cracks and gaps on the garage floor? Usually, while parking the car in the garage, again and again, it may damage the floor.
Especially, if you have a thin layer of topmost concrete layer. However, some homeowners install garage floor panels on it.
But they will also not work after some time if the car is literally very heavy. Because they are made for bearing small and lighter items, not for heavy.
That’s why having concrete is great because you can fix it.
So for fixing the joints, cracks, and gaps on your garage floor surface you can use a concrete floor patch or self-leaving filler.
Both are amazing compounds to work with epoxy floor coating. Make sure to flat the surface after doing this otherwise you may face problems while applying the coat.
7. Mix Up The Epoxy Floor Coating
Have you purchased the complete epoxy floor coating kit? What items do you get in this package? The main items should be epoxy paint and hardener.
That you need to mix with each other. However, the epoxy paint looks like other ordinary paint.
But this is not because epoxy paint is thicker and heavier than other paints. That’s why to make sure not to use any ordinary paint with the hardener.
Otherwise, it will ruin the complete coating. Let’s come over mixing both solutions.
So when you are going to do that you need to be very careful about the process. First, start stirring the epoxy paint and slowly pour the hardener into it.
Then stir this mixture for about 5 minutes or until they completely blend. Then wait for 30 minutes and place it away from the sunlight.
So that these chemicals can react and become a better solution.
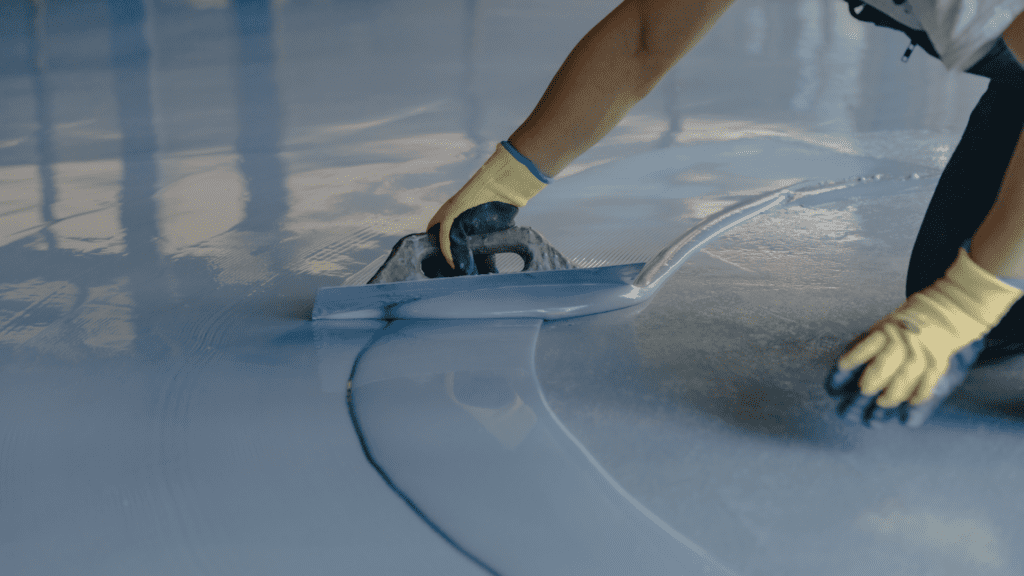
8. Apply Epoxy On The Garage Floor
Have you ever painted anything in your house before? Never think painting a wall or floor surface is an easy thing.
Because you need to keep some important things in your mind. That’s why when the formula is ready to use. Then you need to use it within 2 hours because maybe it dries completely after it.
Also, before using the roller on the garage floor. You need to use a 3 inches paintbrush for covering the corners and borders.
Because doing this with a big roller is quite a difficult thing. But make sure your garage should ventilate properly while doing this process.
So when everything is ready now you can start the main painting process with your roller.
Using the big roller with the big extension you need to cover the floor section by section. So that you will not be confused.
9. Sprinkle The Color Flakes
Do you want to decorate your garage floor surface? Have you used color flakes before? So color flakes are formulated paint aggregates.
That is usually made from the aesthetic and ergonomic qualities of resinous. These color flakes improve the decoration of your garage floor.
Whether you are organizing the party and other things it really looks very well. That’s why after applying the basecoat now you need to sprinkle the color flakes on it.
Make sure to do this carefully. After applying the base coat completely this work becomes difficult.
That’s why when you complete one direction. Then start sprinkling color flakes on it then go further.
The color flakes usually come with the package of an epoxy floor coating kit. Make sure not to use other color flakes.
Because these are specially made for epoxy floor coating.
10. Apply The Top Coat On The Floor
What is the topcoat and how can you apply it to your garage floor surface? The topmost layer is the part of the epoxy floor coating.
That you need to use at the end of the process. Because this will safeguard the other inner layers.
So first you need to follow the above process to mix up this coating. But make sure to better quantity because this coating should be much thicker to protect other layers. So when you mix up then you need to clean the brush and broom.
Then apply it around the corners and borders as I have said earlier. Then going over the further surface. Make sure to complete the garage floor one by one direction.
11. Let Everything Dry Properly
So you have successfully applied epoxy coating on your garage floor. That will protect your garage floor and provide a better look.
But how much time does it require to dry up properly? So if there is moisture in your garage.
Or if the garage is not properly ventilated. Then the time may increase but approximately the epoxy floor coating dries up within 72 hours.
I know this is quite a bit more. But if you want a better garage floor.
Then you need to wait. Also, after applying every coat you need to wait for at least 12 to 24 hours. Then after you can apply the second coat.
Otherwise, both layers will mix up and the work will ruin.
Benefits and Downside Of Epoxy Floor Coating
As you know epoxy floor coating has multiple benefits but what are those and what are the downsides of it. Before understanding, applying it in your garage may be harmful to you.
Benefits Of Epoxy Floor Coating
- Epoxy floor coating prevents your floor from such harmful chemicals.
- Color flakes are available in many designs and shapes to decorate your garage floor.
- After applying the epoxy floor coating on the garage floor you don’t need to take much tension about it. Because it doesn’t require any maintenance.
- This is combined with multiple heating compounds. So that in the winter season you will benefit from it.
Disadvantages Of Epoxy Floor Coating
- Epoxy floor coating is very hard so it produces a noise when walking on the floor.
- Applying multiple coats on the garage floor becomes difficult for you.
- Without using the UV protection coat you will get hurt from it.
Wrap Up On How To Epoxy Garage Floor
Decorating the garage floor is an important thing to feel better. Especially, if you don’t have a better space for having a party with your friends and other things.
Epoxy floor coating improves the looks of your garage and you can make it better.
However, after using the garage, again and again, it damages the floor. But sometimes people don’t want to completely change it.
But replacing the garage floor completely is a great thing if you have the budget for it. Also, the epoxy garage floor doesn’t require that much investment.
Because this is an affordable coating for your garage floor. But most people don’t know about it.
That’s why above I have explained what epoxy floor coating really is. Then the work comes up for applying it. Then you should carefully read the steps above which lead to the best one.
FAQ: 11 Steps To Epoxy Garage Floor
Applying the epoxy coating on the garage floor is a difficult thing. That’s why many people just like you have so many questions to ask.
That can be solved easily. That’s why I have added some of them in this article to provide answers to them.
How much does the epoxy garage floor cost?
The cost of the epoxy garage floor depends on many factors such as quality of the product, quantity, performance, and so on. But overall it will cost you around $150 to $300 for a single car garage.
How long does an epoxy garage floor coating last?
This depends on the flooring traffic you have in your garage. So if you have heavy foot traffic then it will last about 4 to 5 years max. But if you have minimal traffic then it will be about 6 to 7 years and so long.
How much time does the epoxy floor coating take to use?
Applying the epoxy flooring coating on the floor requires multiple days. Because it needs more time to dry one by one. Until drying one layer properly you can’t apply the second one. If you do that then it will ruin the complete coating.