Are you living in a rental house or an apartment where the owner doesn’t allow you to damage his house in any way?
Then hanging the acoustic panels without damaging the walls is a little bit of difficult work.
Because we probably use T-shaped pins that are easily pushed into the walls. But this will damage the walls badly.
According to the report of the National Apartment Association, in the US only around 39 million people are living in apartments. And its demand keeps rising by the day.
So my friend you are not the only one. I am pretty sure most of them who are living in other people’s properties are facing this problem. Because no one wants to damage their house.
But if you are living near a heavy traffic area, or your neighbors are most likely to produce so much noise, you can.
That’s why you can record your masterpiece or connect with your audience on YouTube. Then using some acoustic panels without damaging walls is a great way.
Because this is a win-win situation for both parties. But do you know how you can do that?
What are those ways that will help you to hang all the foam panels without damaging any wall?
That’s why you need to read this article because I have covered the 3 best ways to hang your foam panels without damaging any wall in your room.
Additionally, I have also explained how you can use them with a step-by-step guide.
So don’t miss out on anything otherwise you will not be able to make your room soundproof.
But first, let’s try to understand why you need these acoustic panels and if there are any other ways that you can use them.
Table of Contents
Why You Need To Use Acoustic Panels
Where are you living? Near any traffic place or your neighbors are not peace-loving?
Usually, the higher the noise the better soundproofing you need in your room. Although there are lots of soundproofing materials available in the market.
Such as noise masking, soundproof curtains, different types of sealant, insulations, and more. But they can’t block the higher amount of noise you are facing.
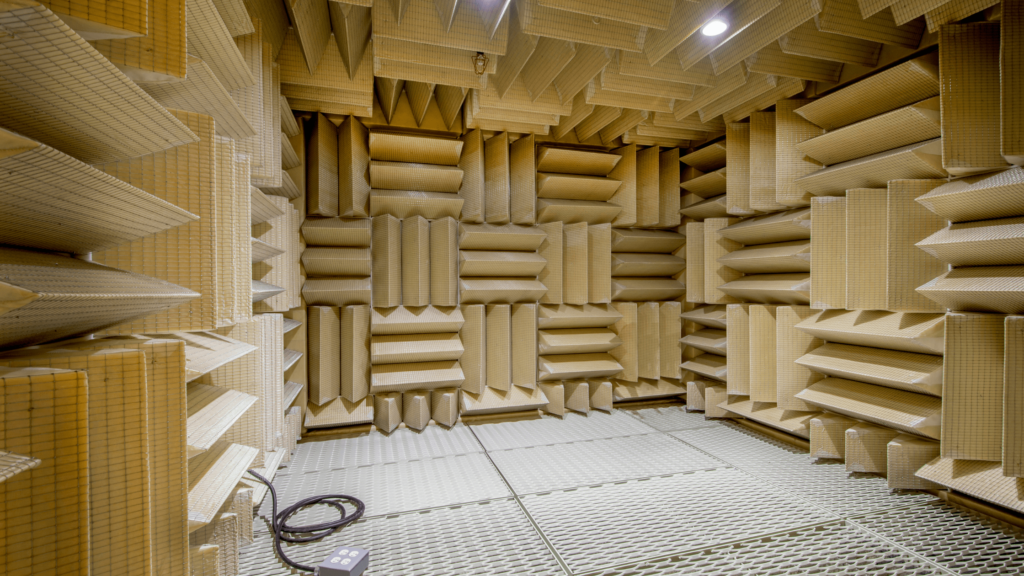
So whether you are a YouTuber or recording any music that you want. Using acoustic panels is the primary choice because acoustic panels have the most sound-deadening properties.
Because they are made with different soundproofing materials such as high-quality foam mixture. That will absorb the noise from the rear side and block it from the backside.
But this is most likely to depend on your budget because the better the quality is acoustic panels the better soundproofing they provide.
Or how many pieces of acoustic panels you need to use in the room.
Usually, start with some pieces, and then if you feel it needs some extra. Then you can also use others. This will help you to minimize your budget.
Pro Tip: Soundproofing panels come in different types such as flat, mushroom, bass, and more. But the pyramid structure of acoustic panels is a great choice.
Now the turn is to understand the best 3 ways to hang your acoustic panels without damaging the walls.
3 Ways To Hang Acoustic Panels Without Damaging Walls
Installing the acoustic panels without damaging the walls is a very tricky job. Because there are lots of other ways that may damage the walls they do not work really great.
But I have found 3 best that will also work better to hang on the walls without damaging them.
1. Use 3M Command Strip
Have you ever stuck anything on the walls or ceiling without pinning anything inside it?
If you have done it then you are familiar with the No products found. because these are the common sticking materials available in the market.
That can hold any small and lighter thing for a long time.
Usually, these strips are the quick and easy way for hanging any picture on the walls and come in double-sided sticking.
This will save lots of your valuable time and you will not need to put lots of effort into it.
You can also use them for hanging the small pieces of acoustic panels on the walls.
Do you know how you can do that? Let’s check out the step-by-step process.
How To Do That: Step By Step Guide
Using these strips is not difficult to do. This is very simple but if you are doing this for the first time.
Then you need to understand how you can properly do that. So that they will work for a long time.
- Rubbing The Walls: Now you need to rub the walls with an alcohol mixture. Do you not use any house cleaner and water? This will not work well with this process.
- Separate The Strips: This process looks very simple but if you don’t do it properly. Then you may lose your chance to do better. That’s why first carefully separate the strips. Then click them together tightly so that their bristles connect the surface easily.
- Remove The One Side: Now you need to remove the first side of its rear side. Then stick on the panels and press them firmly. You can use the four and more for a better bond.
- Remove Remaining: After sticking them onto the acoustic panels now you need to remove the remaining liners. So that you can stick them to the walls. Do forget to press them firmly for at least 30 seconds while sticking them to the walls.
- Remove The Frame: So when the soundproof panel sticks to the wall. Now this time to remove the panel temporarily to ensure the adhesive holds it properly.
- Press The Stirp: When you remove the panel then again you need to press all the stripes on the walls firmly for at least 30 seconds. So that the bond works well.
- Stick The Panel To Wall: This is the last step where you need to wait 1 hour for the adhesive to build. Then align all the strips and press the panel until you will not hear the sound click.
Now your work is finished and you have successfully installed the soundproof panels on the walls.
But if you are still confused then I have an amazing video for you. Just check it out and clear all the doubts.
<iframe width=”1010″ height=”598″ src=”https://www.youtube.com/embed/6bTdtnzPmOE” title=”YouTube video player” frameborder=”0″ allow=”accelerometer; autoplay; clipboard-write; encrypted-media; gyroscope; picture-in-picture” allowfullscreen></iframe>
2. Hang Them With Heavy Duty Cardboard
If you ever used any soundproofing panels in the past. Then you usually know that finding the small size of acoustic panels is difficult.
Because the average size of an acoustic panel is about 12 inches. That’s pretty high to use a 3m command strip.
That’s why you couldn’t find any small acoustic panels.
Then you need to use this way to use any medium and bigger acoustic panel. Don’t worry this will not damage your wall.
Only if you read the process carefully. Because this process is a little bit different from the above one.
Because first, you need to use No products found. for it and then hang it on the walls.
So are you ready to know how you can hang acoustic foam without damaging walls?
If yes, then check out below!.
How To Do That: Step By Step Guide
Sticking anything to the wall needs better adhesive buildup. Otherwise, it will not work after some time.
So if you don’t want to do that again and again. Then you need to read this process carefully.
- Put The Panel Together: Whether you need to install 20, 30, 40, or even 60 pieces of acoustic panels in the entire room. You need to use only 2 or a maximum of 4 pieces on the single cardboard.
- Measure The Area: After putting the 2 or 4 pieces all together now you need to measure the entire area. This will help you to make the next step better.
- Cut The Cardboard: When you measure the area now you need to cut the mail cardboard of heavy-duty plywood according to the size. That is designed to hang the artwork on the walls.
- Stick Panels On The Cardboard: So when you successfully cut the accurate size of the cardboard. Now you need to stick both panels on it. For this work, you need to use heavy-duty glue. So that this will not leave the surface after some time.
- Follow The Above Process: Now you need to follow the above process which I have shared in the 3m command strip. But in this process, you need to use No products found.. That can hold 7 kilograms of weight easily.
So if you properly follow these steps. Then you can easily install all the soundproofing panels inside the room.
That helps you to focus on your work and this will increase efficiency.
3. Stick Them With Adhesive Squares
How much time do you have for installing all the acoustic panels on the walls? If you are a working person or running your own business.
That needs your involvement every day.
Then I am pretty sure you don’t have much time to install all the soundproofing inside your room. Although all the above processes are very simple and easy.
But this needs more time and effort and you need to invest at least 1 day for this work. But if you don’t want to have time then this is the better option for you.
You just need to replace the command stript with these No products found.. That will easily hold all the acoustic panels all the time.
Awesome!. I know that. But how can you use it? Tricky question! Check out below for a step-by-step process.
How To Do That: Step By Step Guide
Installing all the acoustic panels with these adhesive squares is quite easy. But if you don’t know anything about it. Then reading this process helps you to maximize your time and effort.
- Measure The Area: If you have bigger soundproof panels. Then you just need to measure the area of it. This will help you in the next process.
- Clean The Surface: Take the alcohol or isopropyl mixture and clean the surface of the wall where you are going to install these panels. This will clean the dirt without damaging the wall.
- Remove The Liner: Now you need to remove the backside liner of the adhesive square. So that you can apply it to the wall. Make sure to do that properly otherwise it will not provide better adhesive buildup.
- Press Firmly: The same is also applicable in it by pressing the complete area for at least 30 seconds. So that it can perfectly stick with the surface and create a strong bond.
- Remove The Second Liner: After removing the first layer now you also need to remove the second liner. So that you can apply the acoustic foam on it.
- Let It Dry: When you successfully install the soundproof panels on the wall. Now you need to again press them for 30 seconds and leave them for about an hour for adhesive buildup.
Note: Painted walls, varnished wood, concrete, tiles, metal, glass, laminates, and smooth solid surfaces are the great places where you can use these things on the walls. Avoid using these things on textured walls, wallpaper, brick, rough and non-stick surfaces, and fabric.
So these are some of the ways that you can try hanging the acoustic foam without damaging the walls.
Wrap Up On How To Hang Acoustic Foam Without Damaging Walls
Living in a quiet environment is very important for our health and mind.
Because this will increase our work efficiency and prevent every major decision like brain cancer, stress, migraine, and more.
The better your mind calms, the better ideas you can think of. Suppose if you are working on an important project which has a deadline today.
But above your neighbor buzzing his unsound rhythm loudly. Now you have two options: first, go upstairs and ask him to decrease the noise because you are working.
If your neighbor is a better person then he will not play any music. But if not then I am pretty sure he will increase the noise more.
Then at last, you have to work in this loud noise. Otherwise, you will become in a dangerous situation. But think if you have already installed soundproof panels.
Then it will decrease the noise by 70% and for 30% you can use any white noise machine or other soundproofing materials.
How great is that? I know that’s why I have revealed all the ways that I think are the best solution for your problem.
Simply you can use any of them according to your need and situation. I mean if you have small pieces of acoustic panels then you can go with 3m of command stripping.
If not then you can use a heavy-duty picture hanging cardboard to hang the panels on the walls.
Or if you don’t have time then you can go with adhesive squares that are also a great choice for this problem.
But keep in mind that if you want better soundproofing then you may use some other soundproofing materials.
FAQ: Best Ways To Hang Acoustic Panels Without Damaging Walls
Have you ever installed any acoustic panels in the past? If not, then this is a little bit difficult for you. That’s why you may have many problems just like the other people you are facing right now.
They have several questions to ask. That’s why I have added some of them in this article and try my best to give appropriate answers.
If you have another then simply ask in the comment box I will reply as soon as possible.
Can I use the command strip on the ceiling?
Whether you want to hang acoustic panels on the wall or ceiling. You can easily use them on any surface or any place where you want.
But keep in your mind that if you use them under the ceiling. Then this will increase its weight by 20% to 30% because of gravity.
How much weight these command strips and adhesive squares can hold?
When going to the small piece of command strip can hold up to 1 to 2 kilograms maximum.
On the other hand, the larger size can hold up to 7 kilograms of weight. But the recommended weight is around 5 kg.
Where the adhesive squares can hold from 8 to 10 kilograms of weight.
How much does it cost to install all acoustic panels without damaging the walls?
Installing the acoustic panels doesn’t need a big investment. But this may cost you around $2500 to $5000 according to the area of your room and the quality of the panels.
The better the quality the more investment it needs.