Become a great musician and singer needs more and more practice to create a masterpiece.
But if you are recording at home space then you might face annoying noise and vibrations again and again.
That disturbs you and your recording quality. That’s why having a soundproof room within a room works effectively.
And helps you to record better sound quality without any noise disturbance.
Building this room is not so hard but making it completely soundproof needs more attention.
Because you need every possible gap so that outside noise can’t come inside. But what you will do with inside noise?
Do you know your every movement produces vibrations and your every tone creates reverbs inside your soundproof room?
How can you deal with them?
That’s why you need to read this article. Because I have covered how you can fix them and how you can build a perfect soundproof room inside your room.
Additionally, I have also covered the major terminologies behind a soundproof room. So that you can add some other things to improve it.
So let’s understand it first.
Table of Contents
Terminology Behind Soundproofing Within A Room
Do you know what things help you to reduce all the noise and vibrations inside your soundproof room?
How can you improve them? So that you can make your soundproof room effectively.
1. Decoupling
After building the soundproof room will help you reduce the outer noise. But inside vibrations will usually disturb you whenever you enter your soundproof room in your room.
That’s why decoupling is the best solution for it to completely vanish the vibration noise.
In short, decoupling is a process where you use double floors, floating floors, pliable rubber, and more.
All these materials reduce the impact of your movement inside your soundproof room within your room.
2. Damping
Singing in the winter season can be a little bit difficult work. Because a cold atmosphere will impact your vocal cord performance. As a result, you can give your 100%.
That’s why people are using heaters in their houses that usually increase the electricity bills.
That’s why damping is the best solution for this. You don’t need any kind of heater in your soundproof room.
You can convert your singing into heat!!.
Confused!Let me explain, all you need is just use No products found. inside your soundproof room.
It will convert all the kinetic energy into heat. This compound is usually used between panels and drywall.
But if you are serious about eliminating noise and echoes in your soundproof room. Then you need to use it on every possible thing such as floors, ceiling, walls and more.
3. Adding Mass
Improving the soundproofing inside your music room you need to add extra mass.
Because it will help you prevent soundproof from traveling through the surface.
When you use a dense and thicker layer then it will increase the weight that’s why this happens. But usually, this depends on what your budget is.
Also, keep in mind that increasing the weight of your soundproof room increases the extra burden on your house.
So first you need to check how much weight your house can bear. But I suggest you reach out to any professional.
Now let’s understand how you can build an amazing soundproof room within a room.
How To Build A Soundproof Room Within A Room
“Music is a soundtrack of your life” that’s why it needs to be calm and peaceful. So that your audience can understand your feelings.
But all this happens only in the silent environment. That’s why you need to make your music room soundproof as much as possible.
This step-by-step process helps you build a proper soundproof room inside your room.
1. Making Plan & Measuring The Area
What should your soundproof room look like? What acoustic materials are you going to use? How much does it cost?
If you are surrounded by these questions then you are on the right path. Because this will help you make a perfect plan for your soundproof room in your room.
Building a perfect soundproof room always requires a proper plan. So that you can execute the process according to it.
In my case, I always first make a plan, and its result is great for me. Because this will give me a clear idea of what to do next, what things are required and how can I do that.
That’s why if you are serious about your soundproof music room. Then I suggest you also make a plan and include every possible thing that is related to your soundproof music room.
After making a perfect plan, do you know how much bigger your music room should be, how much area it will require.
This is very important to understand before building it. Because measuring the area will help you understand every part of your music room, and where it needs to be placed.
That’s why you should include the right length and width of your walls, ceiling floors, in your measuring notebook.
You need to note down every possible measurement. So that you can build it according to your plan.
2. Building Core Foundation
Do you think only attaching some parts creates your soundproof music studio? If yes, then you are wrong because every structure needs a strong bond that holds all the burden on it.
The same also applies while building the soundproof room.
Before attaching your walls, ceiling, and floors, You need to make a strong bone structure for them. So that it holds all the burden of your music studio.
But how can you make it? Great question!. Let’s understand.
If you can then you can use Australian Buloke because this is the strongest building wood.
But this is not compulsory if you can’t arrange this wood then you can use any available building wood.
When you arrange it then you need to work on the strong structure. The more your soundproof room structure strong the better it will provide noise reduction.
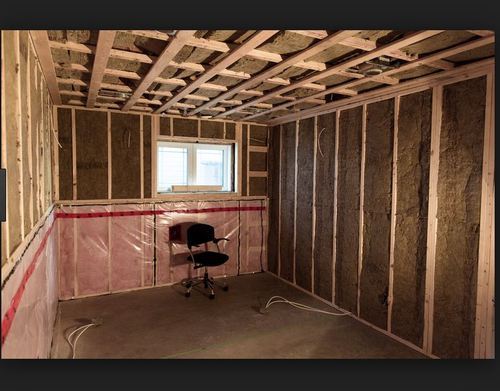
As you have seen in the given image how well he made the structure for his soundproof studio inside his room.
The same you can also be building your room to make it better.
First, you need to start with the walls and install them horizontally. When you complete all the walls then you need to attach them to the ceiling.
But it needs to be well bonded because usually, the noise will come on the top side that’s why.
Installing the window in your soundproof music room is dependent on you. But I suggest you need to install it because it will help you to come air inside.
3. Adding Insulation
If you are facing too much hot or cold weather and you haven’t insulated your house probably.
Then you working in your music room can be a little bit of difficult work for you.
Because you might face either too warm or colder and as a result, you can’t create your masterpiece. That’s why insulation will protect you from this.
So when you successfully install your core foundation then you need added fiberglass insulation between the stud.
Because fiberglass provides higher insulation than any other and also this will not cost you more.
But you need to cover the whole compartment so that it will work effectively. Don’t worry if you are living in a moderate place then you can skip this step.
4. Adding Exterior & Interior Walls
As you know only building a core foundation can’t reduce the outside noise and inside echo.
You need to install interior and exterior walls that will cover the whole structure.
Usually, the walls play a very important role while eliminating low noise frequency. But you need to understand in-depth how you can install it properly.
So first you need to check the measurement to understand the exact height and width of your walls.
Then you need to cut down all the pieces correctly so that you can attach them.
You should use heavy-duty screws for this work so that it can work long-lasting.
First I suggest you install the exterior walls. Because this will easily hold the insulation otherwise it may get out of it.
Then you can install interior walls. This three-layer of protection will easily block the noise and provide you better recording quality.
But if you are building our soundproof room in your basement then you can skip one wall. Because the depth of your basement will easily absorb most of the noise.
5. Installing Ceiling & Floor
Whether you are going to build your soundproof room within your room or in the basement installing the ceiling and floor is very crucial.
Because most of the noise comes inside through the ceiling and vibrations produce through the floors.
That’s why if you need to get rid of this then you need to install the ceiling and floor.
But hold on! if your soundproof room ceiling directly contracts with your house ceiling then it will not work well.
So making the structure you need to leave at least 2 to 5 inches of gap between both of the ceiling.
Instead of this you also use a floating ceiling because it works on the same principle as floating walls.
You need to add the ceiling between the pre-existing joist but there is a downside to it. This floating ceiling will not fit well between them.
So that it will not work well. But this is your choice to select the best one. But in my case I use the standard way because I know how to make it effective.
Before installing the floor you should add a thin layer of rubber sheet. Then you can install the floor that will absorb all the vibrations that usually produce from your movement.
6. Adding Drywall
Adding drywall is the oldest but effective way to isolate noise within the room.
Because sound usually travels through the thin layer of the surface but if you make a thick layer.
Then it can’t travel and you can easily record your masterpiece music. For doing this you need to usually use 2 layers of drywall.
But if you are facing lots of noise disturbance then you can use 3 layers this will increase the sound isolation capacity.
But it will also increase the weight so as I have explained earlier you need to check how much weight your house can hold.
Then you can mix with ½ or 5/8 inches of drywall for effective work.
The materials I suggest are OSB or plywood because these 2 are the top sound reduction materials.
If you go with plywood then you can easily insert the screw. That will effectively attach with your core structure and in the long run, it is quite a better idea.
7. Making The Room Soundproof
Whether you have installed many types of soundproofing material while building your music room.
But after building it you need to make it as much as possible. So that it can provide the best result.
Many types of soundproofing products are available in the market such as acoustic panels, door drafts, soundproof blankets, and more.
But usually, this depends on how much silence you want in your soundproof room to record your music.
To check this well first you need to install all the sound equipment inside your soundproof room. Then record music and check how well the recording quality is. If you think this is not well some noise even disturbs the recording quality.
Then you need to add the soundproof product one by one. Do add them at once otherwise, it will take up all the space and you can’t work properly.
So while installing these products also check how much space it will take. So that you can calculate how much space will be left for your work.
Now you have successfully built your own soundproof room within a room. This will help you create better recording quality.
Wrap Up On To Build A Soundproof Room Within A Room
Working on your vocal cord can be a little bit of difficult work because it needs more and more practice. Whether you have a soundproof room or not.
Usually, the soundproof room is the next step first you need to check are you able to make a career in the music industry. Can you become a great single? Do you have the ability to become a great musician?
If yes, then you should go to the next step and start working on your vocal cord because this is the toughest work.
Usually, vocal cords are triangular cords when they band properly then it will produce better sound quality. Around 70 to 80% of people can’t become a better singer do you why? Because they haven’t thought about the technicalities of improving the voice.
Improve the vocal cord, improve your singing skills and help you become a great musician.
Do you want to know how you can do that? Then you should check Singorama. They have really good teaching techniques for proving the vocal cords.
Keep in your mind that if you really want to learn singing then only visit Singorama. Because this is not easy work you need to work hard.
I have given only away. You need to decide what you want to become.
FAQ: How To Build A Soundproof Room Within A Room
Building a soundproof room inside a room is not so easy that’s why people have many questions and they don’t know any professionals to ask.
That’s why I have added 3 common questions and give appropriate answers after consulting with a professional.
How much does it cost to build a soundproof room within a room?
While understanding the major cost of building a soundproof music room helps you to decide the budget.
Usually, the cost of it depends on how well and effectively you want your soundproof room.
Average Cost – $1,700
Minimum Cost – $1,100
Maximum Cost – $2,500
Do I need to use soundproof paint?
After building your soundproof room in your room and if you have installed every possible soundproofing product.
If this does not work effectively as per your plan then only I advise using soundproof paint.
Because it will not work well on wood and if you have made your soundproof room from it. Then do not use soundproof paint.
What soundproof product is best to absorb noise?
Ans: If you don’t have much space inside your soundproof room and you can only install a single soundproof product.
Then acoustic isolation panels are the best way. Don’t worry they are coming in many shapes, sizes, and designs to choose from.
You can easily install them on your walls.
Thanks for reading. If you find this article useful and effective then please share it with the needy person. So that they can also build an effective soundproof room within a room.