Vinyl flooring is among the most durable, easy to install, and affordable flooring mainly available in sheets, tiles, and plank which gives good looking appearance to your flooring.
But installing vinyl flooring directly onto your existing flooring surface is not a good idea as it needs a smooth and clean surface without a bump.
Well i have seen people installing the vinyl flooring on top of the existing vinyl sub floor.
The process will be much easier, simply just clean the dust of the existing one and start lying up the Vinyl floor.
But if you are planning to prepare a laminate subfloor and then willing to put Vinyl flooring on top of that then in this guide i have explained everything you need to know before laying your laminate subfloor.
Table of Contents
What is a Subfloor and Flooring?
Before deep-diving, I thought to give you a brief on what is sub-floor and flooring and how we will be using laminate sub-floor and vinyl floor covering.
In any flooring construction Joist, Sub-floor, underlayment, and floor covering are the key materials.
Floor covering is the topmost side of the floor construction, which is mainly used to place all our stuff and visible to others.
Here we are planning to use Vinyl as the floor covering, which is available in different colors and most popular these days.
Underlayments are optional and used just below the floor covering and above the sub Floor, here we are planning to use a laminated subfloor.
Subfloor is placed just above the joist and offers the real strong base for the top floor covering and it must be strong enough to bear all types of weight.
Difference Between Vinyl and Laminated flooring?
The vinyl base layer is usually made of fiberglass, which is later coated in PVC vinyl and a plasticizer and later embossed with surface print and is available in tiles and plank.
Installation of the vinyl flooring is a DIY job and you don’t need any professional, the best part it is water-resistant and can be a good choice in the bathroom and kitchen as well.
However Laminated flooring is also used and closely similar to luxury vinyl flooring but the only major difference is, it is made from wood byproducts fused with a laminated process.
Its inner layer is a combination of melamine resin and fiberboard materials and can be easily installed using the tongue and groove plans.
Why use Laminate as Sub Floor?
It is not advisable to use Laminate material as floor covering because it smells when it comes to interacting with water and sometimes advisable to replace it as quickly as possible.
If you would like to clean your flooring on daily basis then having vinyl floor covering is the best idea and that is why if you want to use laminated material then it advisable to use it as a sub-floor only.
Using this as subfloor will be less exposed to water and you don’t need much of its caring and its average cost is around $1 -$5 per square foot for 7 mm thick planks to 12 mm thick planks respectively.
How to Prepare Laminate sub floor to put Vinyl Floor Covering?
You got the importance of sub floor which offer support to the main floor covering and usually people has concreate subfloor on top of which they install underlayment.
But here we are planning to install laminate plank as subfloor and as long as if you prepare flat and smooth surface without bump then the use of underlayment will be optional.
But now you are familiar with the issue of the laminate floor when it exposes to water and for that using the underlayment on top of the laminate subfloor could be the long-lasting solution.
The best underlayment can offer great resistance to moisture and also solve the uneven surface issue of the subfloor.
Before staring sub floor be sure to take below things into consideration.
- Maximum applied load to prepare for the quality of the plank.
- What is the joist spacing to prepare for the size of the plank?
- The finished flooring to get an overview of the flatness of the subfloor.
- The floor covering to understand what will be laid over the subfloor.
What you will need to prepare Laminated sub floor?
- Laminated plank of min size of 4*8 foot.
- Tap measure to check the size.
- 1 Inch or more size screw.
- Drill with a screwdriver.
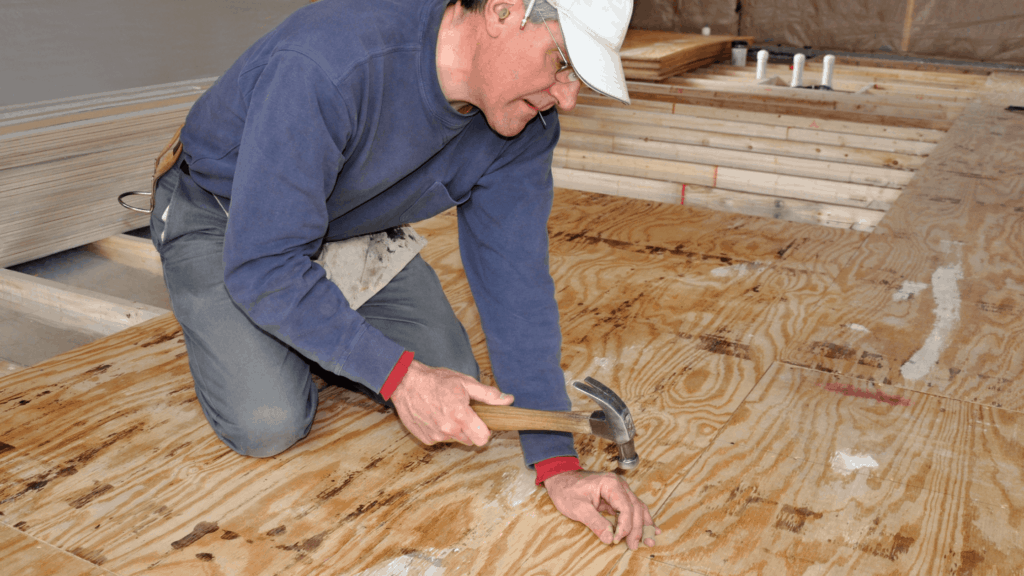
- Hammer
- Pencil
- Chisel
- Subfloor Glue
- Circular saw, jigsaw, or handsaw
- Underlayment and tape (Optional)
Learn how to prepare Laminate subfloor.
1: Have a laminated plank that is larger in size, usually manufacturers offer 4*8-foot sheets.
2: Subfloor is the main area that bears the maximum weight hence the thickness of the plank should be at least 5/8″.
3: Now use the measuring tape and measure the spacing in between studs of the joist support, as we need to make sure our plank will be laid exactly on top of the joist.
4: Make sure each of the planks is covering at least 2-3 support of the joist that strengthens the subfloor and improves its capacity to bear the load.
5: After measuring, draw the same lines on the laminated plank as that will give us an idea of where exactly we need to screw on top of the plank.
6: All the measurement is ready, hence we will start first from the corner of the wall which form 90 degree angle and make sure you placing the laminated plank perpendicular to the joist.
7: Now use an No products found. on top of the joist support that will reduce the chance of squeak noise and offer better joints against the joist.
8: Now place the first plank start from the corner and make sure it aligned perfectly and covering min 2-3 spacing of the joist.The end of the plank should be at the exact centre to the support of the joist.
9: Now place another plank in the same raw until you reach the wall on the opposite side of the first wall or finishes the completely raw, last plank may require to cut to a small size.
10: Make sure to have a spacing of at least 1/2″ in between each plank, as it offers the ability to shrink and expand in different climate situations.
11: Now, if you are comfortable enough then start putting the laminated plank beside the existing one and in the second raw and finish the same raw.
12: Again make sure to maintain the 1/2″ spacing in between both raws and if possible place the second raw 2 planks in such a way that it joints at the exact center of the first raw of any plank and all three has 1/2″ spacing.
13: Now if you have a perfectly laid out plank in both raws, then this time is to drill the plank against the joints using the nails and make sure you use the drawn line of plank for exact drilling the nails against the joist.
14: Continue the same pattern of the placement of the laminated plank and I am sure the last plank in each raw will require a different size.
15: Cut the plank using the available saw for the required measured exact size and place it to the exact place and screw this as well.
16: Once you are finished with placement, make sure none of the planks are left for screw and covered complete area and use a hammer to fix any nails which are not drilled perfectly.
17: If you have found unevenness on the subfloor now place underlayment on top of the subfloor.
18: Place the underlayment start from the corner side and they are adhesive in nature so you can stick the ending of one with the other.
Continue till the complete area is covered and now you have a beautiful laminated subfloor ready to lay down vinyl flooring.
Wrap up on Preparing laminate sub floor
Ideally, it is recommended to not use laminated planks as subfloor as you can have other hardwood planks that can be used for the sole purpose of the subfloor.
If you can use an adhesive to stick the plank that will offer an additional advantage and make sure to choose the thickness of the plank should be at least 5/8″.
Follow the joist as it might not be always straight so have a saw or cutter in pace to have defined shape for the plank which ends at the exact top of the joist so you can drill that.
Placement of the laminated plank as subfloor is not different than others as it ultimately needs to drilled against the joist.
I am sure this guide has answered lot many questions on subflor preparation for the laminated plank.